How to Use Steps Recorder
The Problem Steps Recorder was introduced in the Vista operating system, and the name was shortened to Steps Recorder in Windows 8. It’s an excellent tool to help you create documentation and also to capture an issue a user may be experiencing.
How Does the Steps Recorder Work?
It works by capturing your activities as you use the system. It captures your inputs and the image on the screen at that time.
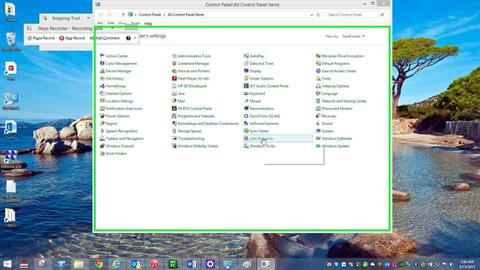
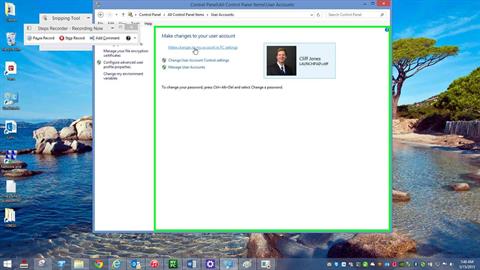
A green indicator shows where you were active on the screen. Notice in this brief example the text that is captured as a step and the associated view of the desktop:
Step 1: (5/15/2015 7:48:35 AM) User left click on "User Accounts (link)" in "Control Panel\All Control Panel Items" 
Step 2: (5/15/2015 7:48:37 AM) User left click on "Make changes to my account in PC settings (link)" in "Control Panel\All Control Panel Items\User Accounts"
It will capture and record whatever you are doing on the screen and produces an editable .mht file.
I use it to record the configuration of Connectors in Exchange or any other configuration that I want to document. It simplifies the creation of administrative or user documentation.
Also, if a user is experiencing an issue, they can use the recorder to capture their session and then send the captured file to support personnel for diagnosis.
Start your 7-day free trial with QuickStart and begin your certification preparation journey for all the most in-demand certifications by the top IT vendors including Microsoft, AWS, Google, CompTIA, ITIL, NetApp and more.
How to Use the Steps Recorder
To Start the Steps Recorder, from the Start screen type “Steps Recorder” or you can run the psr.exe executable.
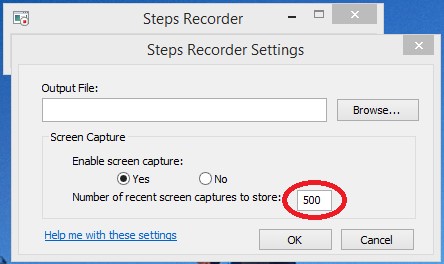
The next thing I like to do is take a look at the settings. The downward pointing arrow will expose the settings menu.
You can set the location for the file to be saved after the capture process. You can also adjust the number of recent screen captures to store.
Click OK to save your changes and now you’re ready to start capturing. Simply click the Start Record button and begin working with the system.
You can also pause your capture using the Pause Record button and then you use the Stop Record button when you’re finished.
When you are finished, you can save or discard the capture. You can edit the .mht file to add additional graphics or text, or you can use it as it is.
Conclusion
The Steps Recorder is an excellent tool for creating documentation. It’s also a simple solution that users can take advantage of to capture issues they are experiencing for support personnel.
Additional Resources
Microsoft:
http://windows.microsoft.com/en-US/windows7/How-do-I-use-Problem-Steps-Recorder
MSDN:
Connect with our experts for guidance in which courses and certification training will be best to help you take your career to new heights.
