
MobX Quick Start Guide
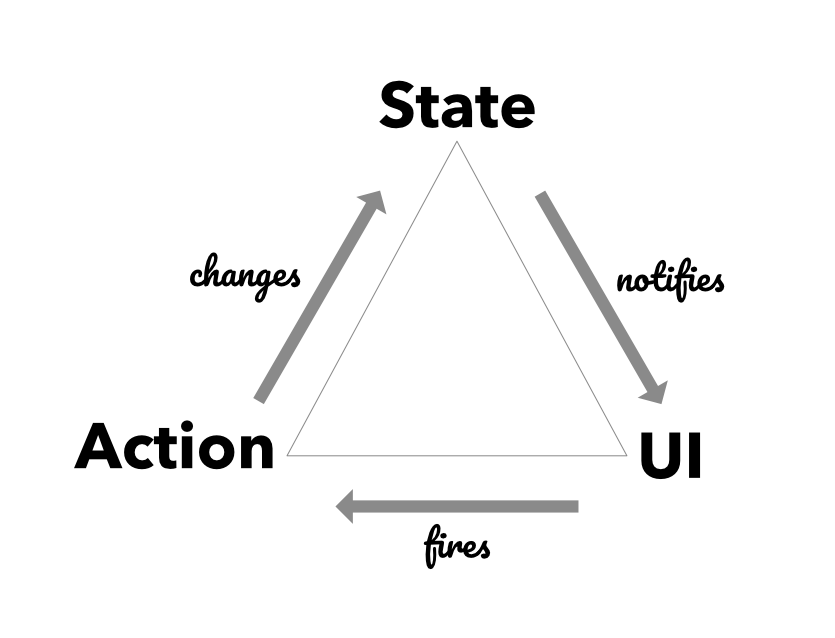
State Management is an aspect of your application that controls what is ultimately rendered. It's the pumping heart that spreads data across your app and brings various components to life. The state of a Web Application, like the ones built with React.js, rely on the central Store as the single source of truth. Actions originating in the UI are fired on this store to modify the state. This results in a new version of the state, which is notified back to the UI by the Store. This cycle of Actions --> Store --> UI is always uni-directional and makes it easy to understand the data-flow in the application.
Jumping into MobX
MobX embraces this idea and provides a model of Transparent Functional Reactive Programming (TFRP) that eliminates much of the boilerplate in setting up this data-flow. MobX is a state-management framework that comes with a simple, yet powerful set of building blocks, such as Observables, Actions and Reactions. These three concepts form the junctions of the data-flow triad.
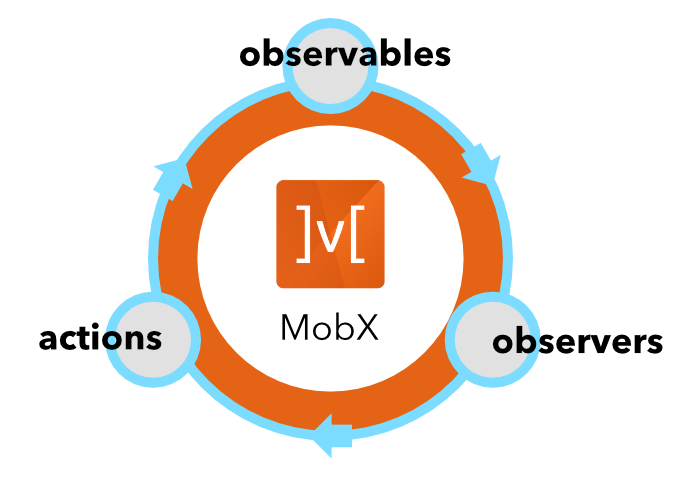
Observables carry the central mutable-state of your application. As this state changes, it fires notifications that can be observed by other participants (aka observers) of the data-flow triad. Reactions are the primary observers in MobX. The UI (React Components) is modeled as a reaction and happens to be the most glorious observer in the system. These components observe the observable-state and render the visual representations of data.
Reacting to a change in observable-state is also known as a side-effect. The UI is the most visible side-effect in your application.
With observables carrying the reactive, mutable state of your application and reactions acting as the side-effects, we are missing the third piece: actions. Actions are the mutating functions that cause the real changes to the observable state. A React Component cannot (and should not) modify the mutable state directly. Instead, it fires actions, which internally cause the desired changes to the observables.
State Management is hard
As your application scales in size, it becomes necessary to pay close attention to how state is being changed from different parts of your application. It is quite common to have several async operations going on in your app, such as network calls, timers or promise-based operations. Managing the success, failure states of these operations and ensuring that the UI is not going out of sync, can become challenging. With MobX, you can map these to a set of observables, actions and reactions and wire them together without much boilerplate.
This is one of the reasons why MobX has stormed into popularity. There has been huge adoption in lots of companies, from the startups to the Fortune 500s.
A Taste of MobX
Consider this snippet of MobX that wires a TodoComponent (the UI, aka reaction) to a TodoStore (the observable). By firing actions from the UI, we mutate the state of the Todo, which gets observed by TodoComponent to re-render the state.
import React, { Fragment } from 'react';

import ReactDOM from 'react-dom';

import { observable, action, computed, reaction } from 'mobx';

import { observer, inject, Provider } from 'mobx-react';

import './styles.css';


class TodoStore {

    @observable

    done = false;


    @observable

    title = '';


    @computed

    get json() {

        return {

            done: this.done,

            title: this.title,

        };

    }


    constructor() {

        reaction(

            () => this.json,

            json => {

                /* Make call to save on server */

            },

        );

    }


    @action

    toggleDone = () => {

        this.done = !this.done;

    };


    @action

    setTitle(title) {

        this.title = title;

    }

}

@inject(stores => ({ todo: stores.store }))

@observer

class TodoComponent extends React.Component {

    render() {

        const { json, done, title } = this.props.todo;


        return (


            <Fragment>

                <div

                    style={

                        display: 'flex',

                        flexDirection: 'row',

                        alignItems: 'center',

                    }

                >

                    <input

                        type="checkbox"

                        checked={done}

                        onChange={store.toggleDone}

                    />

                    <input

                        type="text"

                        style={ flex: 1 }

                        value={title}

                        onChange={event => store.setTitle(event.target.value)}

                    />

                </div>


                <pre>{JSON.stringify(json)}</pre>

            </Fragment>   l

        );

    }

}


const store = new TodoStore();

class App extends React.Component {

    render() {

        return (

            <Provider store={store}>

                <TodoComponent />

            </Provider>

        );

    }

}

ReactDOM.render(<App />, document.getElementById('root'));
Notice the use of decorators such as @observable, @action, @observer and @inject that sets up the connections between the Store, React Components and the firing of actions. This is the minimal and essential boilerplate you have to write to create a React Component that automatically re-renders itself anytime the done or title properties change.
You can also see the use of @computed, a special decorator that automatically tracks its dependent observables and produces up-to-date values. Such properties are called computed-properties or derivations in MobX.
In the constructor of the TodoStore, we have setup a simple reaction that monitors the computed json property. When it changes, it fires a network call to persist the todo on the server. The json property internally tracks the done and titleproperties and changes whenever any of them change.
The reaction() in this case runs a "persist to server" side-effect whenever the json property changes. It can also track if the call completely successfully or failed due to various reasons. To do that we can simply keep an observable property called status, which can take one of three values: 'pending' | 'completed' | 'failed'.
The code could look something like below:
    /* ... */


    @observable

    status = '';


    constructor() {

        reaction(

            () => this.json,

            async json => {

                this.status = 'pending';

                try {

                    await persistTodo(json);

                    this.status = 'completed';

                } catch (e) {

                    this.status = 'failed';

                }

            },

        );

    }


    /* ... */

}
The TodoComponent can track this in its render() and show the status as it changes.
Scaling the app
The example above was fairly simple and was meant to introduce the concepts behind MobX. A real-world application would be much more complex with multiple stores and interconnected relationships between stores. There will be several reactions (aka side-effects) firing as the state changes in the app. Managing all these is definitely not easy but certainly made simpler with MobX.
What is interesting is the mental model you need to develop to handle the growing complexity, which is exactly the same for the simple TodoStore we saw above. So the learning curve stays relatively flat and it becomes a pleasure to scale the app and add more features.
To get you up to speed with MobX and also learn all the practices for developing large-scale app, take a look at MobX Quick Start Guide. Although the title suggests a "quick start", it goes quite deep and even touches on the inner workings of the MobX system.